Tuesday, November 11, 2014

Surveillance DVR Hard Drive Installation

JPEG200 Surveillance System DVR 
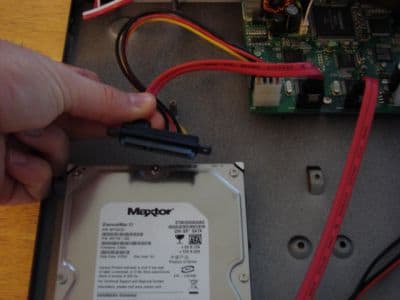
CCTV Camera Pros provides the following instructions for our  incase you need to install or replace a hard disk drive.  Please follow the below instructions to install a new hard drive into your surveillance DVR.  Please note that you should first contact CCTV Camera Pros if you believe that your hard drive is not working properly before you open up your DVRs case.  It does not happen often but from time to time hard disk drives do go bad like any other electronic component.


Hard Drive Replacement Installation

Please follow these instructions to replace the hard drive in your JP surveilance DVR.
  1. Using a small phillips head screw driver, remove the 8 screws that hold the top cover in place on the DVR.  There are 4 screws on the top of the unit and 2 screws on each side.  After you remove the screws, the cover of the DVR should easily slid off.
  2. Unplug the power and SATA cable from the back of the hard drive as seen below:

    Unhook DVR Hard Drive
  3. Unscrew the hard drive from the DVR by turning the DVR on its side.  There are normally 4 screws holding the hard drive to the bottom of the DVR case. When you get to the last screw, be sure to hold the hard drive so that it does not drop.
  4. Attach the new hard drive to your DVR using the same screws that you removed the old drive with in step 3.
  5. Attach the power and SATA cable to the back of the new hard drive.
  6. Install the DVRs cover back into place.
  7. Re-attach your DVRs power supply and monitor.
  8. Boot up your DVR and allow the DVR to fully initialize.
  9. When complete login to your DVR by pressing the menu button on the DVR or the remote control and enter your password.  The default password is blank (just press OK).
  10. Select Configuration from the System menu.
  11. Select HDD Management from the Configuration menu.
  12. Select HDD Setup from the HDD Management menu.
  13. Your DVR should be displaying "Change HDD" next to the HDD Status.  Select HDD Clear and press Enter or OK.
  14. Enter your password when prompt.
  15. If successful, you will be brought back to the HDD Setup screen and the HDD Status will now say "Empty".
  16. Press the Menu button on your DVR several times until you exit completely out of the menu system and see your security cameras.
  17. Test that your DVR can properly record by pushing the record button on your DVR or remote control.  Let the DVR record for at least 10 seconds.
  18. Press Stop on the DVR to stop recording.
  19. Press the Search button on your DVR or remote.
  20. Select Search Bar from the Search menu.
  21. Press Enter on the Search Bar screen.
  22. Your DVR should begin playing the test video footage that it just recorded.

Adding a 2nd HDD to your DVR

CCTV Camera Pros JP surveillance DVRs support up to two hard drives.  Each drive can be up to 750 GB in size.  Follow the below instructions to install a 2nd HDD into your DVR.
  1. Using a small phillips head screw driver, remove the 8 screws that hold the top cover in place on the DVR.  There are 4 screws on the top of the unit and 2 screws on each side.  After you remove the screws, the cover of the DVR should easily slid off.
  2. Mount the second hard drive in the 2nd bay / port of your DVR.  You will find an extra SATA HDD connector already attached to the second port of the DVR.  Please see the image below.
    DVR Hard Drive Ports
  3. After you attach your HDD to the DVR case, attach the SATA cable to the hard drive.  When you are done, you can put the cover back on your DVR and secure it with the screws.
  4. Re-attach the power of your DVR, the BNC connections to your cameras, and the monitor.
  5. Boot up your DVR and allow the DVR to fully initialize.
  6. When complete login to your DVR by pressing the menu button on the DVR or the remote control and enter your password.  The default password is blank (just press OK).
  7. Select Configuration from the System menu.
  8. Select HDD Management from the Configuration menu.
  9. Select HDD Setup from the HDD Management menu.
  10. Your DVR should be displaying "Change HDD" next to the HDD Status.  Select HDD Clear and press Enter or OK.
  11. Enter your password when prompt.
  12. If successful, you will be brought back to the HDD Setup screen and the HDD Status will now say "Empty".
  13. Press the Menu button to go back to the HDD Management screen.
  14. Select HDD Information.  You should now see a Master-1 and a Master 2 Hard drive listed on the HDD Information screen.
  15. Press the Menu button on your DVR several times until you exit completely out of the menu system and see your security cameras.
  16. Test that your DVR can properly record by pushing the record button on your DVR or remote control.  Let the DVR record for at least 10 seconds.
  17. Press Stop on the DVR to stop recording.
  18. Press the Search button on your DVR or remote.
  19. Select Search Bar from the Search menu.
  20. Press Enter on the Search Bar screen.
  21. Your DVR should begin playing the test video footage that it just recorded.

How to Install a Security / CCTV System for Your Home

The idea of drilling holes through the walls of your home to run video and power cables for a security camera system might seem difficult and daunting; however with a little bit of information you might find it to be fairly simple and an enjoyable project.
Ad

Steps

  1. Install a Security _ CCTV System for Your Home Step 1.jpg
    1
    Get the right cables. RG59 Siamese Cable, is the industry standard type of cable used for most CCTV installs. This cable consists of one video cable and one power cable (Positive and Negative), thus the name Siamese.
    Ad
  2. Install a Security _ CCTV System for Your Home Step 2.jpg
    2
    Find the right location for your cameras. There is a special CCTV design software to choose a right location for CCTV camera. For example you can use a demo of IP Video System Design Tool. You can import your floor plans/site plan into this software and then add cameras, choose desired camera coverage and get angle of view, required lens focal length and 3D mockups.
  3. Install a Security _ CCTV System for Your Home Step 3.jpg
    3
    For most homes cameras are installed where the roof meets the walls of the house. This is a good location because it shelters the cameras from the elements (Wind, rain, snow and sun). Also, cameras placed near the roof usually have a better field of view and are less likely to be vandalized. Another advantage is simplified cable runs Power & video) since many homes have a small gap or hole where cables can be run between the roof and the wall.
  4. Install a Security _ CCTV System for Your Home Step 4.jpg
    4
    Find a point of entrance from the outside of the house to the inside. Most homes have an attic which is a great place to run all your RG59 lines into.
  5. Install a Security _ CCTV System for Your Home Step 5.jpg
    5
    Designate one location for your DVR and Monitor to be stationed.
  6. Install a Security _ CCTV System for Your Home Step 6.jpg
    6
    Bring all the RG59 lines into that room from the attic. If you purchased the RG59 cable with BNC connections already attached then at this point you would connect these to the DVR.
  7. Install a Security _ CCTV System for Your Home Step 7.jpg
    7
    If you purchased a bulk roll of RG59 cable without connections you would need to purchase the BNC connections and crimp each end on, then connect to the DVR.
  8. Install a Security _ CCTV System for Your Home Step 8.jpg
    8
    These cameras require DC voltage for their power supply. You can either connect the power supply line from each camera separately into an outlet (using pig tails) and an AC Adapter, or you can get an AC/DC power supply box, plug all the camera power lines into the box, then connect one AC power line from the outlet to the box.
  9. Install a Security _ CCTV System for Your Home Step 9.jpg
    9
    Warning:-In either case you must ensure that the correct DC voltage is supplied to your cameras or they will suffer permanent damage.
  10. Install a Security _ CCTV System for Your Home Step 10.jpg
    10
    It is recommended that the DVR be connected to your Monitor before turning on their power supply.
  11. Install a Security _ CCTV System for Your Home Step 11.jpg
    11
    This can be an easy and entertaining project once you have the appropriate tools and information.