Tuesday, November 11, 2014

Surveillance DVR Hard Drive Installation

JPEG200 Surveillance System DVR 
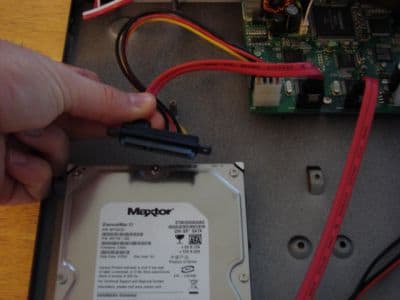
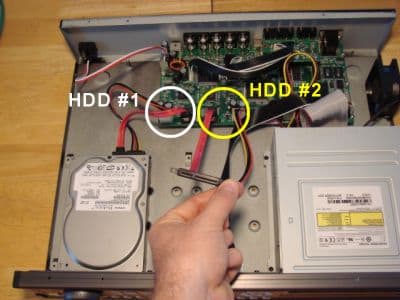
CCTV Camera Pros provides the following instructions for our  incase you need to install or replace a hard disk drive.  Please follow the below instructions to install a new hard drive into your surveillance DVR.  Please note that you should first contact CCTV Camera Pros if you believe that your hard drive is not working properly before you open up your DVRs case.  It does not happen often but from time to time hard disk drives do go bad like any other electronic component.


Hard Drive Replacement Installation

Please follow these instructions to replace the hard drive in your JP surveilance DVR.
  1. Using a small phillips head screw driver, remove the 8 screws that hold the top cover in place on the DVR.  There are 4 screws on the top of the unit and 2 screws on each side.  After you remove the screws, the cover of the DVR should easily slid off.
  2. Unplug the power and SATA cable from the back of the hard drive as seen below:

    Unhook DVR Hard Drive
  3. Unscrew the hard drive from the DVR by turning the DVR on its side.  There are normally 4 screws holding the hard drive to the bottom of the DVR case. When you get to the last screw, be sure to hold the hard drive so that it does not drop.
  4. Attach the new hard drive to your DVR using the same screws that you removed the old drive with in step 3.
  5. Attach the power and SATA cable to the back of the new hard drive.
  6. Install the DVRs cover back into place.
  7. Re-attach your DVRs power supply and monitor.
  8. Boot up your DVR and allow the DVR to fully initialize.
  9. When complete login to your DVR by pressing the menu button on the DVR or the remote control and enter your password.  The default password is blank (just press OK).
  10. Select Configuration from the System menu.
  11. Select HDD Management from the Configuration menu.
  12. Select HDD Setup from the HDD Management menu.
  13. Your DVR should be displaying "Change HDD" next to the HDD Status.  Select HDD Clear and press Enter or OK.
  14. Enter your password when prompt.
  15. If successful, you will be brought back to the HDD Setup screen and the HDD Status will now say "Empty".
  16. Press the Menu button on your DVR several times until you exit completely out of the menu system and see your security cameras.
  17. Test that your DVR can properly record by pushing the record button on your DVR or remote control.  Let the DVR record for at least 10 seconds.
  18. Press Stop on the DVR to stop recording.
  19. Press the Search button on your DVR or remote.
  20. Select Search Bar from the Search menu.
  21. Press Enter on the Search Bar screen.
  22. Your DVR should begin playing the test video footage that it just recorded.

Adding a 2nd HDD to your DVR

CCTV Camera Pros JP surveillance DVRs support up to two hard drives.  Each drive can be up to 750 GB in size.  Follow the below instructions to install a 2nd HDD into your DVR.
  1. Using a small phillips head screw driver, remove the 8 screws that hold the top cover in place on the DVR.  There are 4 screws on the top of the unit and 2 screws on each side.  After you remove the screws, the cover of the DVR should easily slid off.
  2. Mount the second hard drive in the 2nd bay / port of your DVR.  You will find an extra SATA HDD connector already attached to the second port of the DVR.  Please see the image below.
    DVR Hard Drive Ports
  3. After you attach your HDD to the DVR case, attach the SATA cable to the hard drive.  When you are done, you can put the cover back on your DVR and secure it with the screws.
  4. Re-attach the power of your DVR, the BNC connections to your cameras, and the monitor.
  5. Boot up your DVR and allow the DVR to fully initialize.
  6. When complete login to your DVR by pressing the menu button on the DVR or the remote control and enter your password.  The default password is blank (just press OK).
  7. Select Configuration from the System menu.
  8. Select HDD Management from the Configuration menu.
  9. Select HDD Setup from the HDD Management menu.
  10. Your DVR should be displaying "Change HDD" next to the HDD Status.  Select HDD Clear and press Enter or OK.
  11. Enter your password when prompt.
  12. If successful, you will be brought back to the HDD Setup screen and the HDD Status will now say "Empty".
  13. Press the Menu button to go back to the HDD Management screen.
  14. Select HDD Information.  You should now see a Master-1 and a Master 2 Hard drive listed on the HDD Information screen.
  15. Press the Menu button on your DVR several times until you exit completely out of the menu system and see your security cameras.
  16. Test that your DVR can properly record by pushing the record button on your DVR or remote control.  Let the DVR record for at least 10 seconds.
  17. Press Stop on the DVR to stop recording.
  18. Press the Search button on your DVR or remote.
  19. Select Search Bar from the Search menu.
  20. Press Enter on the Search Bar screen.
  21. Your DVR should begin playing the test video footage that it just recorded.

How to Install a Security / CCTV System for Your Home

The idea of drilling holes through the walls of your home to run video and power cables for a security camera system might seem difficult and daunting; however with a little bit of information you might find it to be fairly simple and an enjoyable project.
Ad

Steps

  1. Install a Security _ CCTV System for Your Home Step 1.jpg
    1
    Get the right cables. RG59 Siamese Cable, is the industry standard type of cable used for most CCTV installs. This cable consists of one video cable and one power cable (Positive and Negative), thus the name Siamese.
    Ad
  2. Install a Security _ CCTV System for Your Home Step 2.jpg
    2
    Find the right location for your cameras. There is a special CCTV design software to choose a right location for CCTV camera. For example you can use a demo of IP Video System Design Tool. You can import your floor plans/site plan into this software and then add cameras, choose desired camera coverage and get angle of view, required lens focal length and 3D mockups.
  3. Install a Security _ CCTV System for Your Home Step 3.jpg
    3
    For most homes cameras are installed where the roof meets the walls of the house. This is a good location because it shelters the cameras from the elements (Wind, rain, snow and sun). Also, cameras placed near the roof usually have a better field of view and are less likely to be vandalized. Another advantage is simplified cable runs Power & video) since many homes have a small gap or hole where cables can be run between the roof and the wall.
  4. Install a Security _ CCTV System for Your Home Step 4.jpg
    4
    Find a point of entrance from the outside of the house to the inside. Most homes have an attic which is a great place to run all your RG59 lines into.
  5. Install a Security _ CCTV System for Your Home Step 5.jpg
    5
    Designate one location for your DVR and Monitor to be stationed.
  6. Install a Security _ CCTV System for Your Home Step 6.jpg
    6
    Bring all the RG59 lines into that room from the attic. If you purchased the RG59 cable with BNC connections already attached then at this point you would connect these to the DVR.
  7. Install a Security _ CCTV System for Your Home Step 7.jpg
    7
    If you purchased a bulk roll of RG59 cable without connections you would need to purchase the BNC connections and crimp each end on, then connect to the DVR.
  8. Install a Security _ CCTV System for Your Home Step 8.jpg
    8
    These cameras require DC voltage for their power supply. You can either connect the power supply line from each camera separately into an outlet (using pig tails) and an AC Adapter, or you can get an AC/DC power supply box, plug all the camera power lines into the box, then connect one AC power line from the outlet to the box.
  9. Install a Security _ CCTV System for Your Home Step 9.jpg
    9
    Warning:-In either case you must ensure that the correct DC voltage is supplied to your cameras or they will suffer permanent damage.
  10. Install a Security _ CCTV System for Your Home Step 10.jpg
    10
    It is recommended that the DVR be connected to your Monitor before turning on their power supply.
  11. Install a Security _ CCTV System for Your Home Step 11.jpg
    11
    This can be an easy and entertaining project once you have the appropriate tools and information.

Wednesday, August 13, 2014

How to Choose a Wireless Router


How to Choose a Wireless Router
A wireless router is a critical piece of hardware in a home local area network, or LAN. It can also be troublesome and difficult to install and maintain. Looking carefully for the best wireless router can be helpful for those who want to profit from a wireless high-speed Internet connection in the home or a small business, or anywhere else that wireless routers are used. Although everyone's shopping experience is different, here are some common steps to help you choose a wireless router that will be a good fit for your wireless network.
Ad
Steps
  1. Choose a Wireless Router Step 1.jpg
1
Evaluate signal strength. Different wireless routers are rated for different signal strengths. Even for a small apartment, signal strength can be an issue even with the most-up-to-date router. Figure out which one fits your network needs. Signal strength is best evaluated by real-life tests, and not from manufacturer's published specifications. (see "Tests" below).
    • Understand obstacles in an interior home environment, as well as the specific distance that the signal will need to go for use in any particular part of the building.
Ad
  1. 2
Decide on speed. Make sure the router will support an existing Internet connection (Cable, DSL, etc.)
    • Look at Mbps, or megabits per second. For the latest routers, the theoretical limit is 600 mbps; most up-to-date routers support 300 mbps (802.11N standard). The previous standard (802.11G) is 54 Mbps. Check the manufacturer's documentation or ask a knowledgeable salesperson about the specifications.
Choose a Wireless Router Step 2Bullet1.jpg
    • 802.11N. Find out whether your client devices all support 802.11N standard. If all of them do, you are safe to choose 802.11N router. If they don't (and have 802.11G instead), keep in mind that when N device is used at the same time with G device, effective speed is greatly reduced.
Choose a Wireless Router Step 2Bullet2.jpg
    • 2.4 GHz, 5GHz and non/concurrent dual-band:
Choose a Wireless Router Step 2Bullet3.jpg
      • If you need to use G and N devices at the same time, a dual-band router will help to avoid interference: you can connect a G device to 2.4GHz, and an N device to 5 GHz.
      • Remember that the concurrent dual-band router and dual-band client wifi adapter don't always mean double speed. If your PC has only one Wi-Fi adapter, you can only connect to one band at a time. Even if you have 2 adapters, under Windows it doesn't give you double speed, only the maximum of either.
      • 5GHz gives weaker signal compared to 2.4GHz, especially at longer distance from router.
  1. Choose a Wireless Router Step 3.jpg
3
Test your choice of equipment. Find a real-life speed throughput and range tests for the models you consider. Specifications give only a theoretical maximum, while tests will show how it will actually perform. Search the following website on Google, smallnetbuilder.com/lanwan/router-charts/view SmallNetBuilder comparison charts and cnet.com.au/internet-networking/modems-routers/reviews.htm CNet.com.au reviews that offer test speed throughput
  1. Choose a Wireless Router Step 4.jpg
4
Choose encryption. Think about the need for encryption. Wireless routers often employ WPA or other kinds of encryption to protect the network from intruders. You may need technical assistance from your router's manufacturer.
  1. Choose a Wireless Router Step 5.jpg
5
Keep in mind compatibility issues. One of the other essential elements of choosing the best wireless router is to figure out how it will complement existing pieces of hardware in a home network.
    • Look at matching the brand of a wireless router with the brand of existing network cards. For computer workstations or other hardware without built-in network capability, some network cards or cartridges allow the computer to access the wireless network. When the router matches these small adaptors or cards, the LAN connection may have better speed.
    • Think about matching a video game console. For example, the Nintendo Wii is a household hardware element that is often connected to a home wireless network. Although Nintendo does not promote a specific brand of wireless router, understanding compatibility with video game consoles can be another factor in choosing your router and other network equipment (client Wi-Fi adapters; NAS etc).
  1. 6
Evaluate customer support. Buy a wireless router from a company with good customer support. Technical support and assistance may be critical for installing or dealing with the device.
  1. Choose a Wireless Router Step 7.jpg
7
Compare warranties. One strategy for buying the best wireless router is to select one that will be guaranteed to last a certain length of time. Look carefully at warranty provisions and make this part of the pro and con list for specific brands and models.